Using Net2Net to speed up network training

When training neural networks there are 2 things that combine to make life frustrating:

  1. Neural networks can take an insane amount of time of train.
  2. How well a network is able to learn can be hugely affected by the choice of hyper parameters(hyper parameters here refers mainly to the numbers of layer and numbers of nodes per layer, but can also include learning rate, activation functions, etc) and without training a network in full you can only guess at which choices are better.
If a network could be trained quickly number 2 wouldn’t really matter, we could just do a grid search(or even particle swarm optimization(or maybe Bayesian optimization)) to run through a lots of different possibilities and select the hyper parameters with the best results. But for something like reinforcement learning in computer games the amount of time to train is counted in days so better hope your first guess was good…

My current research is around ways to try and get neural networks to adjust there size automatically, so that if there isn’t sufficient capacity in a network it will in some way determine this and resize itself. So far my success has been (very) limited, but while working on that I thought I would share this paper: Net2Net: Accelerating Learning via Knowledge Transfer which has a good, simple approach to resizing networks manually while keeping there activation unchanged.

I have posted a numpy implementation of it here on Github.

Being able to manually resize a trained network can give big savings on networks training time because when searching through hyper parameters options you can start off with a small partially trained network and see how adding extra hidden nodes or layers affects test results.

Net2Net comprises of 2 algorithms Net2WiderNet which adds nodes to a layer and Net2DeeperNet which adds a new layers. The code for Net2WiderNet in numpy looks like this:
https://gist.github.com/DanielSlater/edbecd61527aa4e833d947c4110c31b8.js

This creates the weights and biases for a layer 1 wider than the existing one. To increases the size by more nodes simply do this multiple times(note the finished library on github has the parameter new_layer_size to set exactly how big you want it). The new node is a clone of a random node from the same layer. The original node and it’s copy then have their outputs to the next layer halved so that the overall output from the network is unchanged.

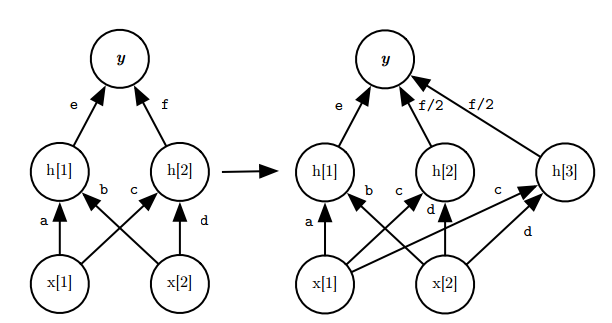
How Net2WiderNet extends a layer with 2 hidden node layer to have 3


Unfortunately if 2 nodes in the same layer have exactly the same parameters then their activation will always be identical, which means their back propagated error will always be identical, they will update in the same way, their activation will still be the same, then you gained nothing by adding the new node… To stop this happening a small amount of noise is injected into the new node. This means as they train they have the potential to move further and further apart while training.

Net2DeeperNet is quite simple, it creates an identity layer, then adds a small amount of noise. This means that the network activation is only unchanged if the layer is a linear layer, because otherwise the activation functions non-linearity will alter the output. So bare in mind if you have an activation function on your new layer(and you almost certainly will) then the network output will be changed and will have worse performance until it has gone through some amount of training.
Here is the code:

BEGIN NET 2 DEEPER NET https://gist.github.com/DanielSlater/75df407b8f422e2b2c3d60bc65aeae14.js END NET 2 DEEPER NET

Usage in TensorFlow

This technique could be used in any neural network library/framework, but here is how you might use it in TensorFlow.

In this example we first train a minimal network with 100 hidden nodes in the first and second layers and train it for 75 epochs. Then we do a grid search of different numbers of hidden nodes for 50 epochs to see which lead to the best test accuracy.

https://gist.github.com/DanielSlater/96a4ccd17c2853026de8ad85856f1cc0.js
Here are the final results for the different numbers of hidden nodes:

1st layer 2nd layer Train accuracy Test accuracy
100 100 99.04% 93.47%
150 100 99.29% 93.37%
150 150 99.01% 93.58%
200 100 99.31% 93.69%
200 150 98.99% 93.63%
200 200 99.17% 93.54%
Note: don’t take this as the best choice for MNIST, this could still be improved by longer training, dropout to stop overfitting, batch normalization, etc

Deep-Q learning Pong with Tensorflow and PyGame

In a previous post we went built a framework for running learning agents against PyGame. Now we’ll try and build something in it that can learn to play Pong.

We will be aided in this quest by two trusty friends Tensorflow Google’s recently released numerical computation library and this paper on reinforcement learning for Atari games by Deepmind. I’m going to assume some knowledge of Tensorflow here, if you don’t know much about it, it’s quite similar to Theano and here is a good starting point for learning.

Prerequisites

  • You will need Python 2 or 3 installed.
  • You will need to install PyGame which can be obtained here.
  • You will need to install Tensforflow which can be grabbed here.
  • You will need PyGamePlayer which can be cloned from the git hub here.
If you want to skip to the end the completed Deep Q agent is here in the PyGamePlayer project. The rest of this post with deal with why it works and how to build it.

Q-Learning

If you read the Deepmind paper you will find this definition of the Q function:
Q function
Lets try and understand it bit by bit. Imagine an agent trying to find it’s way out of a maze. In each step he knows his current location, s in the equation above, and can take an action, a, moving one square in any direction, unless blocked by a wall. If he gets to the exit he will get a reward and is moved to a new random square in the maze. The reward is represented by the r in the equation. The task Q-Learning aims to solve is learning the most efficient way to navigate the maze to get the greatest reward.
Bunny agent attempts to locate carrot reward

If the agent were to start by moving around the maze randomly he would eventually hit the reward which would let him know it’s location. He could then easily learn the rule that if your state is the reward square then you get a reward. He can also learn that if in any square adjacent to the reward square and you take the action of moving towards it you will get the reward. Thus he knows exactly the reward associated with those actions and can prioritize them over other actions.
But if just choosing the action with the biggest reward the agent won’t get far as for most squares the reward is zero. This where the max Q*(s’,a’) bit of the question comes in. We judge the reward we get from an action not just based on the reward we get for the state it puts us in but also best reward we could get from the best(max) actions available to us in that state. The gamma symbol γ is a const between 0 and 1 that acts as a discount on the reward of things in the future. So the action that gets the reward now is judged better than the action that gives the reward 2 turns from now.

The function Q* represents the abstract notion of the ideal Q* function, in most complex cases it will be impossible to calculate that exactly so we use a function approximator Q(s, a; θ). When a machine learning paper references a function approximator they are (almost always) talking about a neural net. These nets in Q learning are often referred to as Q-nets. The θ symbol in the Q function represents the parameters(weights and bias) of our net. In order to train our layer we will need a loss function, that is defined as:

Loss function

y here is the expected reward of the state using the parameters of our Q from iteration i-1. Here an example of running a q-function in tensorflow. In this example we are running the simplest state possible. It is just an array of states, with a reward for each and the agents actions are moving to adjacent states:

Setting up the agent in PyGamePlayer

Create a new file in the your current workspace, that should have the PyGamePlayer project it in(or simply create a new file in the examples directory in PyGamePlayer). Then create a new class that inherits from the PongPlayer class. This will handle getting the environment feedback for us. It gives reward when ever the players score increase and punishes whenever the opponents score increases. We will also add a main here to run it.

DeepQPongPlayer https://gist.github.com/DanielSlater/01c95b4e47dd12aa415a.js

If you run this you will see the player moving to the bottom of the screen as the pong AI mercilessly destroys him. More inteligence is needed, so we will override the get_keys_pressed method to actually do some real work. Also as a first step, because the Pong screen is quite big and I’m guessing none of us have a super computer lets compress the screen image so it’s not quite so tough on our gpu.

get_keys_pressed https://gist.github.com/DanielSlater/3e386976d2034eeee197.js

How do we apply Q-Learning to Pong?

Q-Learning makes plenty of sense in a maze scenario but how do we apply it to pong? The Q-function actions are simply the key press options, up, down, or no key pressed. The state could be the screen, but the problem with this is that even after compression our state is still huge, also Pong is a dynamic game, you can’t just look at a static frame and know what’s going on. Most importantly what direction the ball is moving.

We will want our input to be not just the current frame, but the last few frames, say 4. 80 times 80 pixels is 6400 times 4 frames that’s 25600 data points and each can be in 2 states(black or white) meaning there are 2 to the power of 25600 possible screen states. Slightly too many for any computer to reasonably deal with.

This is where the deep bit of deep Q come in. We will use deep convolutional nets(for a good write up of these try here) to compress that huge screen space into a smaller space of just 512 floats and then learn our q function from that output.

So first lets create our convolutional network with Tensorflow:

Create networkhttps://gist.github.com/DanielSlater/2b9afcc9dfa6eda0f39d.js

Now we will use the exact same technique we used for the simple Q-Learning example above, but this time the state will be a collection of the last 4 frames of the game and there will be 3 possible actions.

This is how you train the network:

https://gist.github.com/DanielSlater/f611a3aa737d894b689f.js
And getting the chosen action looks like this:

https://gist.github.com/DanielSlater/240fdfd4b42dcb2fb33d.js
So get_key_presses needs to be changed to store these observations:

https://gist.github.com/DanielSlater/b6781cc5bfdf0f5385bc.js
The normal training time for something like this even with a good GPU is in the order of days. But even if you were to train the current agent for days it would still perform pretty poorly. The reason for this is because if we start using the Q-function to determine our actions it will initially be exploring the space with a very poor weights. It is very likely that it will find some simple action that leads to a small improvement and get struck in a local minima doing that.

What we want is too delay using our weights until the agent has a good understanding of the space in which it exists. A good way to initially explore the space is to move randomly then over time slowly add in more and more moves chosen by the agent until eventually the agent is in full control.

Add this to the get_key_presses method
https://gist.github.com/DanielSlater/030e747a918abe8cff5f.js And then make the choose_next_action method this:
https://gist.github.com/DanielSlater/82a8209652bc593695e1.js And so now hazar, we have a Pong AI!

The PyGamePlayer project: https://github.com/DanielSlater/PyGamePlayer
The complete code for this example is here
Also I’ve now added the games mini-pong and half-pong which should be quicker to train against if you want to try out modifications.
And further here is a video of a talk I’ve done on this subject

How to run learning agents against PyGame


PyGame is the best supported library for programming games in Python. There are 1000’s of open source games that have been built with it.
I wanted to do some reinforcement learning neural networks in games and PyGame seemed the best choice.
But I was a bit disappointed that most examples involved hacking the original game files.

I wanted to see if I could write a general framework for running learning agents in PyGame that would require zero touching of the games files.
If you are interested in writing your own implementation of this then read on, but if you just want to dive straight in and start playing with your own learning agents I’ve uploaded a project here which contains examples of setting up Pong and Tetris.

Getting started

  • You will need Python 2 or 3 installed.
  • You will need to install PyGame which can be obtained here. You can also install it via pip, but this can be tricky in windows.
  • You will need numpy, downloadable from here or again can be installed from pip
  • You will also need a game of some sort to try and set up. Here is a good simple pong game.

    The plan

    There are 3 things a learning agent needs to be able to play a game:
    1. An array of all the pixels on the screen when ever it is updated.
    2. The ability to output a set of key presses back into the game.
    3. A feedback value to tell it when it is doing well/badly.
    We will tackle them in order.

    Grabbing the screen buffer

    In PyGame there is this handy method which will give us a 3 dimensional numpy array for each colour of every pixel on screen.

     screen = pygame.surfarray.array3d(pygame.display.get_surface())  

    We could write our learning agent by hacking the game file and inserting this line into the main loop after the screen has been updated. But a better way to do it(and a way that allows us to have zero touches of the game file) is to intercept any calls to the pygame.display.update method and then grab the buffer then, like so:

     import pygame  
    import pygame.surfarray

    # function that we can give two functions to and will return us a new function that calls both
    def function_combine(screen_update_func, our_intercepting_func):
    def wrap(*args, **kwargs):
    screen_update_func(*args,
    **kwargs) # call the screen update func we intercepted so the screen buffer is updated
    our_intercepting_func() # call our own function to get the screen buffer
    return wrap

    def on_screen_update():
    surface_array = pygame.surfarray.array3d(pygame.display.get_surface())
    print("We got the screen array")
    print(surface_array)

    # set our on_screen_update function to always get called whenever the screen updated
    pygame.display.update = function_combine(pygame.display.update, on_screen_update)
    # FYI the screen can also be modified via flip, so this might be needed for some games
    pygame.display.flip = function_combine(pygame.display.flip, on_screen_update)

    You can try this out by inserting this code before you start your game and it will print out the screen buffer as it comes in.

    Intercepting key presses

    The normal method in PyGame detecting key presses is via this method:

     events = pygame.event.get()  

    So we can intercept it and have it return our learning agents key presses:

     import pygame  
    from pygame.constants import K_DOWN, KEYDOWN

    def function_intercept(intercepted_func, intercepting_func):
    def wrap(*args, **kwargs):
    # call the function we are intercepting and get it's result
    real_results = intercepted_func(*args, **kwargs)
    # call our own function and return our new results
    new_results = intercepting_func(real_results, *args, **kwargs)
    return new_results
    return wrap

    def just_press_down_key(actual_events, *args, **kwargs):
    return [pygame.event.Event(KEYDOWN, {"key": K_DOWN})]

    pygame.event.get = function_intercept(pygame.event.get, just_press_down_key)

    I should also warn you that the pygame.event.get method can be called with args to filter out which events are needed. If your running a game that uses these you will either need to handle them or just use my complete implementation here.

    Getting feedback to the player

    The final piece of the puzzle is handling the feedback/reward from the game. Unfortunately there is no standard way of doing scoring in PyGame so this will always require some amount of going through the game code, but it can still be done with zero touches.

    For the pong game the scores are stored in two global variables bar1_score and bar2_score, which can be imported. Our reward is when the score changes in our favor.

     last_bar1_score = last_bar2_score = 0  

    def get_feedback():
    global last_bar1_score, last_bar2_score

    # import must be done inside the method because otherwise importing would cause the game to start playing
    from games.pong import bar1_score, bar2_score
    # get the difference in score between this and the last run
    score_change = (bar1_score - last_bar1_score) - (bar2_score - last_bar2_score)
    last_bar1_score = bar1_score
    last_bar2_score = bar2_score
    return score_change

    But for other games, such as Tetris there may not be a globally scoped score variable we can grab. But there may be a method or a set of that methods that we know are good/bad. Such as a player_takes_damage, level_up or kill_enemy. We can use our function_intercept code from before to grab these. Here is an example in Tetris using the result of removeCompleteLines to reward our agent:

     import tetris  

    new_reward = 0.0
    def add_removed_lines_to_reward(lines_removed, *args, **kwargs):
    global new_reward
    new_reward += lines_removed
    return lines_removed

    tetris.removeCompleteLines = function_intercept(tetris.removeCompleteLines,
    add_removed_lines_to_reward)

    def get_reward():
    global new_reward
    temp = new_reward
    new_reward = 0.0
    return temp

    Dealing with frame rates

    One final issue that you may need to consider is that the learning agent will significantly impact the execution speed of the game. In a lot of games the physics is scaled by the elapsed time since the last update. If your agent takes 1 second to process a single frame in pong then in the next update loop the ball will have already passed off the screen. The agent may also struggle to learn if there is significant variance in the movement of different frames.
    This can be handled by intercepting the pygame.time.get_ticks method and pygame.time.Clock in the same way as we have the other functions. See this file for details.

    Pong in PyGamePlayer

    Now all that remains is too stitch all those parts together and plug in the learning agent. In my project I’ve chosen to do this in a class, but it would be fine as a script.
    Below is an example of the full thing set up to learn against Pong using the PyGamePlayer module. The PongPlayer simply needs to inherit from the PyGamePlayer class and implement the get_keys_pressed and get_feeback methods, the framework handles everything else.

     from pygame.constants import K_DOWN  
    from pygame_player import PyGamePlayer

    class PongPlayer(PyGamePlayer):
    def __init__(self):
    """
    Example class for playing Pong
    """
    super(PongPlayer, self).__init__(force_game_fps=10) # we want to run at 10 frames per second
    self.last_bar1_score = 0.0
    self.last_bar2_score = 0.0

    def get_keys_pressed(self, screen_array, feedback):
    # The code for running the actual learning agent would go here with the screen_array and feeback as the inputs
    # and an output for each key in the game, activating them if they are over some threshold.
    return [K_DOWN]

    def get_feedback(self):
    # import must be done here because otherwise importing would cause the game to start playing
    from games.pong import bar1_score, bar2_score

    # get the difference in score between this and the last run
    score_change = (bar1_score - self.last_bar1_score) - (bar2_score - self.last_bar2_score)
    self.last_bar1_score = bar1_score
    self.last_bar2_score = bar2_score
    return score_change

    if __name__ == '__main__':
    player = PongPlayer()
    player.start()
    # importing pong will start the game playing
    import games.pong

    So hazar! We now have the worlds worst Pong AI.

    In my next post I’ll go through writing a good reinforcement learning agent for this.
    If you have any questions/correction please don’t hesitate to contact me.

    Full source code here.

    Particle Swarm Optimization in Python

    Here is a short and sweet particle swarm optimization implementation in Python. For more information on particle swarm optimization check out Particle swarm optimization in F#

    Example usage is like so:

    def simple_error_function(args):  
    return args[0]+args[1]

    number_of_parameters = 2
    max_iterations = 100
    best_parameters, best_error_score = particle_swarm_optimize(simple_error_function,
    number_of_parameters, max_iterations)

    The result will be the parameters that resulted in the lowest value for the simpe_error_function

    You can add custom parameter initialization:

    def simple_error_function(args):
    return args[0]+args[1]

    def parameter_init():
    return random.random()*0.5-10

    number_of_parameters = 2
    max_iterations = 100
    best_parameters, best_error_score = particle_swarm_optimize(simple_error_function, number_of_parameters,
    max_iterations, weight_init, parameter_init=parameter_init)

    Other arguments

    •  stopping_error: float = 0.001 #stop when we have a particle with this score 
    • num_particles: int = 10 #number of particles to run 
    • max_iterations_without_improvement: int = 10 #stop when we have this many consecutive turns without improvement 
    • c1: float = 2.0 # c1 PSO parameter 
    • c2: float = 2.0 # c1 PSO parameter